
This tutorial is a step by step guide to install Ubuntu 15.10 “cunning werewolf (Wily Werewolf)”, released in October 2015. However, it is largely compatible with earlier versions and probably 16 versions of the distribution and its derivatives (Kubuntu etc.).
Note that this version of Ubuntu is the first to integrate Systemd. If you want a stable version and supported long-term, install the Ubuntu 14.04 LTS.
What is Ubuntu?
Ubuntu is a GNU / Linux distribution based on Debian. The project was launched in 2004 by South African billionaire Mark Shuttleworth, former Debian developer; It is sponsored by his company Canonical. It is a “desktop” distribution that is intended for the general public.
Choose version
Before starting the installation, you must choose the version of Ubuntu you would like to install:
If you do not want to choose or do not know know the difference between the different versions, take the Ubuntu version, stable, Intel 64-bit architecture. The ISO image of this version is called ubuntu-15.10-desktop-amd64.iso (ubuntu-15.10-desktop-i386.iso for 32-bit Intel-based processors). To see if your processor is a 32 bit or 64 bit, read: Tips: Know processor 64-bit or 32-bit. In all cases, if your computer is new, it is most likely that you have a 64 bit processor.
You can get your version of Ubuntu directly from Ubuntu Doc, or download it directly from the official link.
We will then put that ISO image into use, typically a blank DVD or USB stick. If you need help with this, follow this guide.
For a satisfactory use of Ubuntu 15.10, we recommend you have a minimum configuration of 1 Ghz processor, 10 GB of space on the hard drive and 4 GB of memory (RAM).
The step by step guide to install Ubuntu 15.10
Before starting the installation, it may be interesting to note the following;
- You know what Ubuntu is and what it does
- Keep a backup of your hard drive because this might result in data loss
- Your PC is connected to a power source to avoid power outage
- You have downloaded and correctly burned the ISO image to a CD/DVD or a USB stick
- And finally, you agree to take responsibility for whatever happens to your PC or data.
Step 1 (Startup)
Insert the CD or DVD (or USB stick, memory card etc.) Ubuntu in your drive. Restart your computer. If the BIOS is configured to boot first from the CD / DVD drive – this is usually the case – you should see a purple homescreen time the installer will load.
After a few moments, you get the following window:
Step 2 (Installation)
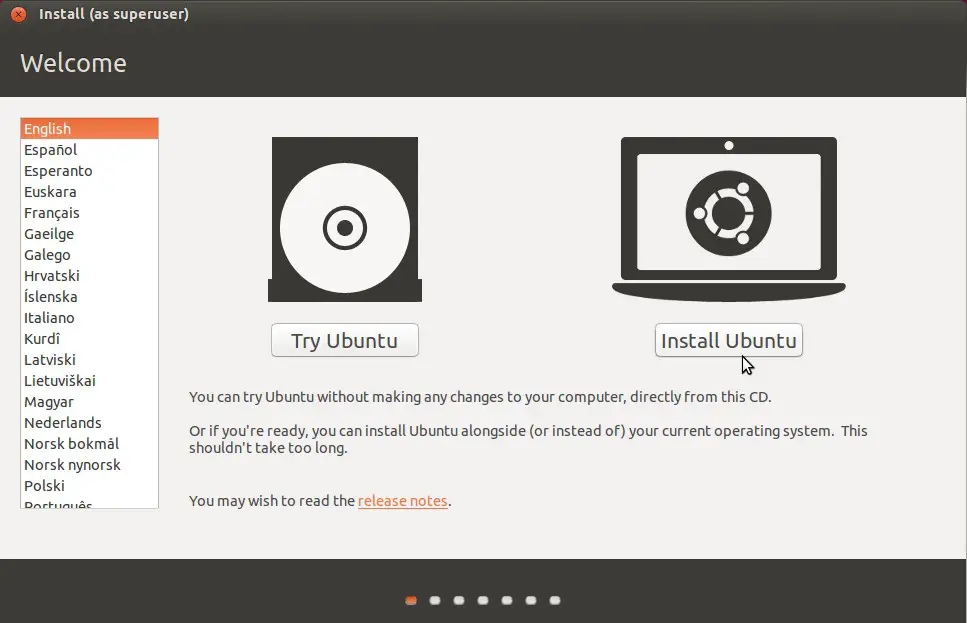
Ubuntu gives you option to select what language you would like to set during the installation process, by default, English language is selected but you can choose any language of your choice from the list.
Now choose Install Ubuntu to continue with the installation.
Note: You can actually use the ‘Try Ubuntu’ option to test run the operating system without installing it permanently on your disk drive, but if you should run Ubuntu in this mode, all your saved document, browser history, downloads and software installations will be erased when the system shuts down or reboots. Therefore, only select the ‘Try Ubuntu’ option if you just want to test Ubuntu or want to see if you’ll be convinced to switch to the operating system.
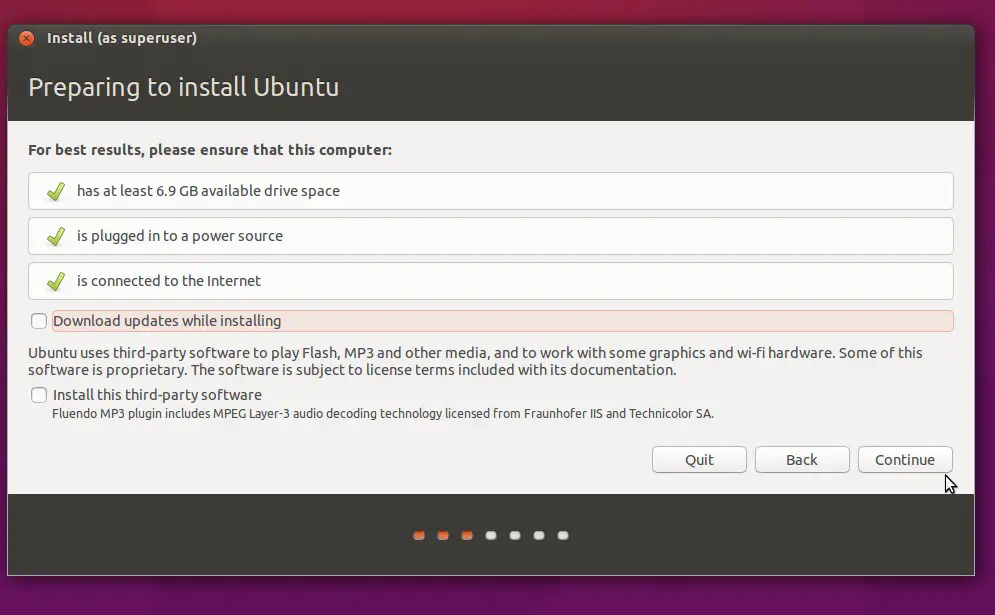
After clicking ‘Install Ubuntu’, the next screen shows if the system has enough space to install the new version of ubuntu 15.10, it also checks if the PC is connected to a power source, and finally checks if the computer is connected to the internet (Not Compulsory).
Ubuntu offers to download updates during installation, particularly in order to install third-party software (Flash, MP3 Player). If you are a casual user who just wants all programs to work, check the boxes. Anyways, you can always install the softwares thereafter. Then click “Continue”.
Step 3 (Disk Partitioning)
This is is the most technical aspect of it all, but if you follow the instructions carefully, you should pass the stage with ease.
Disk partitioning, which will allow formatting partitions.
NOTE: remember to back up your important data: A little error might lead to you formatting the drive and this will result in you losing all of your important data.
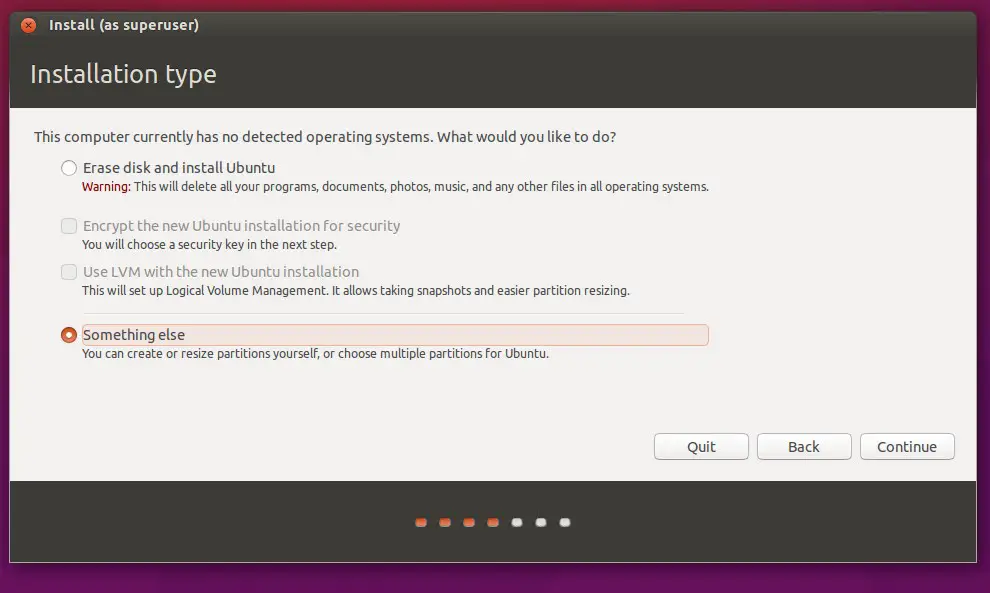
Several choices are available to you (Ubuntu does offer you some choices depending on your situation):
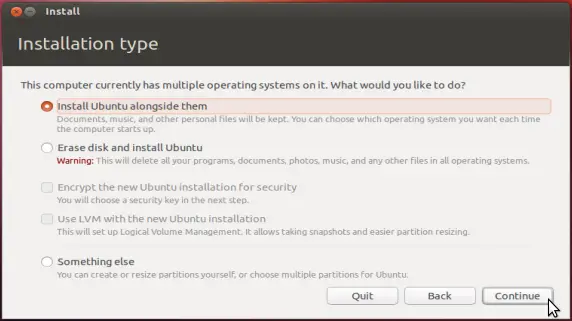
- If you want to remove your existing operating system or your hard drive is empty, select “Erase disk and install Ubuntu.” (Note: This will wipe all of your data on the drive)
- If you want to keep another operating system on the machine, for example to make a dual boot along Microsoft Windows or another GNU / Linux distribution, select “Install ubuntu Alongside…”. This option will only appear if there is an existing operating system on the machine. You just have to click and choose how you want to partition your old system. For Ubuntu, we recommend you keep a minimum of 10 GB. Please note that after installation, the boot program (boot loader) on your system will be replaced by the one of Ubuntu.
- If you had an older version of Ubuntu, you will be offered “… upgrade Ubuntu to Ubuntu 15.10” to simply update it, keeping all your files and configuration of your office and your software; if not to forget the past, choose “Delete and reinstall Ubuntu …”. You should absolutely choose this second option if your version of Ubuntu has more than a year: the system complete updates are not perfect and may cause many bugs. As well do a new clean install.
- If you have already installed Ubuntu 15.10 on your computer, you can choose between “Reinstall Ubuntu 15.10” and “Delete and reinstall Ubuntu 15.10”. The second choice is cleaner.
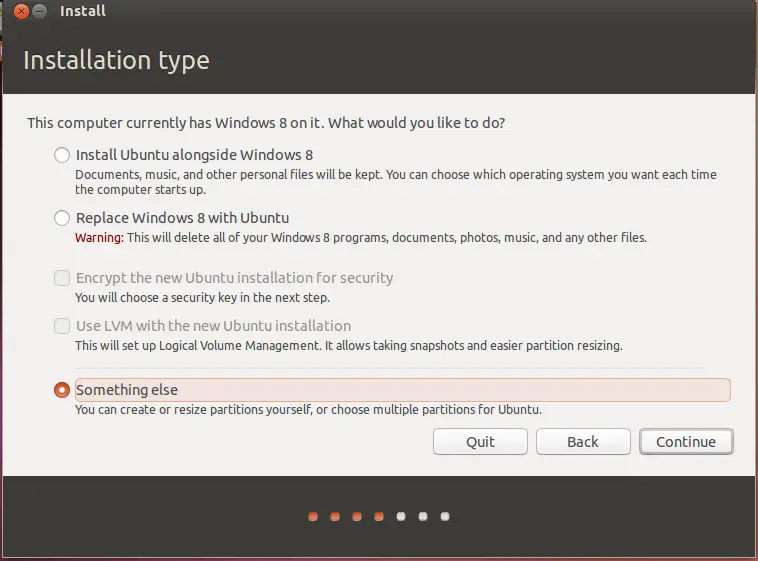
- This leaves us with one more option ‘Something Else‘ (It is highly recommended you choose this option if you do not plan to wipe your drive or if you have Windows installed on the drive already).
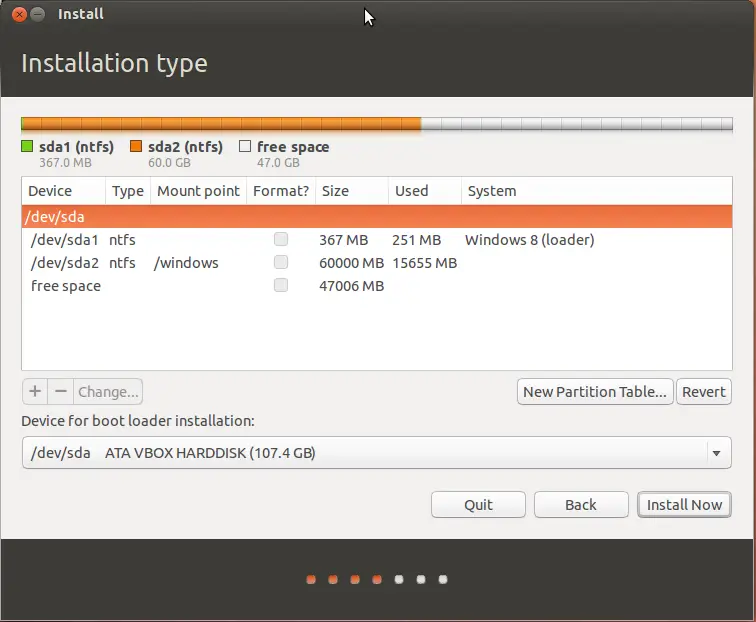
Partitioning your Disk Drive after selecting the ‘Something Else’ option in Ubuntu Installation
This is most popular option among Ubuntu users because it gives you the freedom to allocate your desired disk space to Ubuntu installation and you can leave other space for Microsoft Windows and any other operating system you planned running alongside Ubuntu.
a. After selecting this option, the next screen will display the partition table for your drive where you will see all of the partition the disk contains.
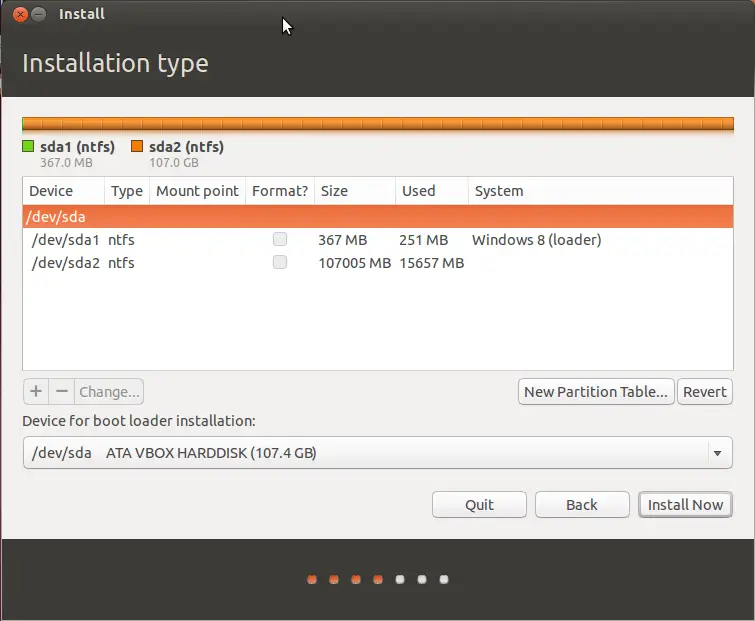
b. The next step requires you to free space for your incoming Ubuntu operating system
- Select the Windows drive (Note: Don’t select the drive with loader after it). It should be the biggest drive in the map.
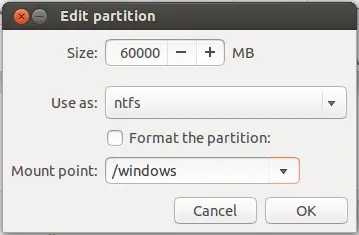
- Click on the change button. Reduce Windows’ partition to 60% of it’s size. Notice that you should remain some free space on it, 20 GiB should be enough.
In this tutorial, we’ll be creating 40GB for Ubuntu installation; therefore, your partition should now look like this;
c. It is highly recommended that you create partition for Swap (The partition for keeping unused memory pages which is also used for hibernation).
- Select free space and click +
- Set parameters like on the picture below:
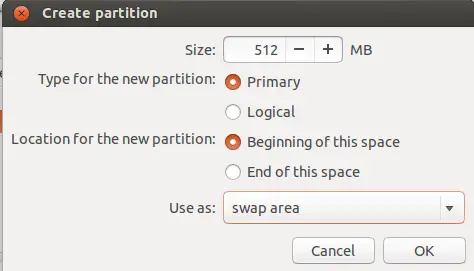
Note: If you plan using hibernation, your swap size should be more than your physical memory. And placing the location to the end disk space will work also but might lead to a slowness in terms of functionality, so it is recommended you place it at the beginning.
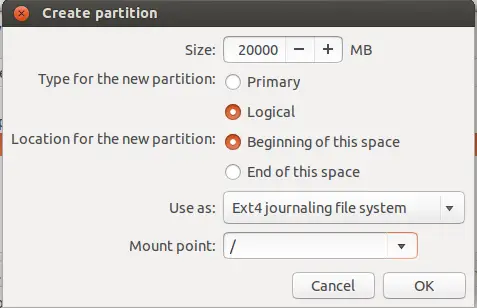
d. Create partition for / (root fs). This is the filesystem that contains your kernel, boot files, system files, command-line utilities, libraries, system-wide configuration files and logs.
- Select free space and click +
- Between 10 to 20GB should be enough for the root fs partition
- Set parameters like on the picture below:
e. The final step requires you to create a /home partition. This partition will be used to store user files such as Images, Music, Videos, and Documents. This is equivalent to the Users folder in windows. To create the /home partition, follow the same steps as step in step d above.
Now after the partitioning is completed, your drive should now look like this;
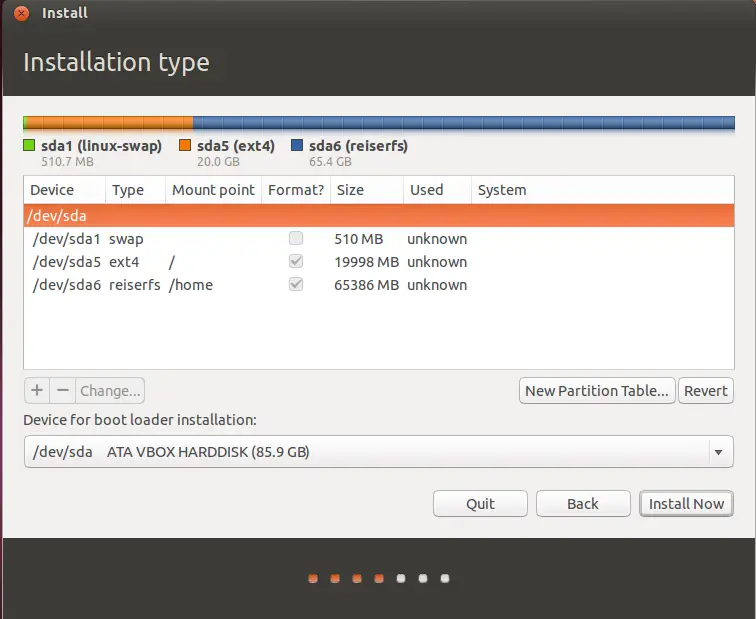
Now click on the Install Now button to start the installation of Ubuntu.
Step 4 (Installation and Configuration)
While the system is being installed (formatting partitions, copying files), Ubuntu offers you option to configure your desktop at the same time. This stage lasts about 5 minutes.
Configuring Your Timezone
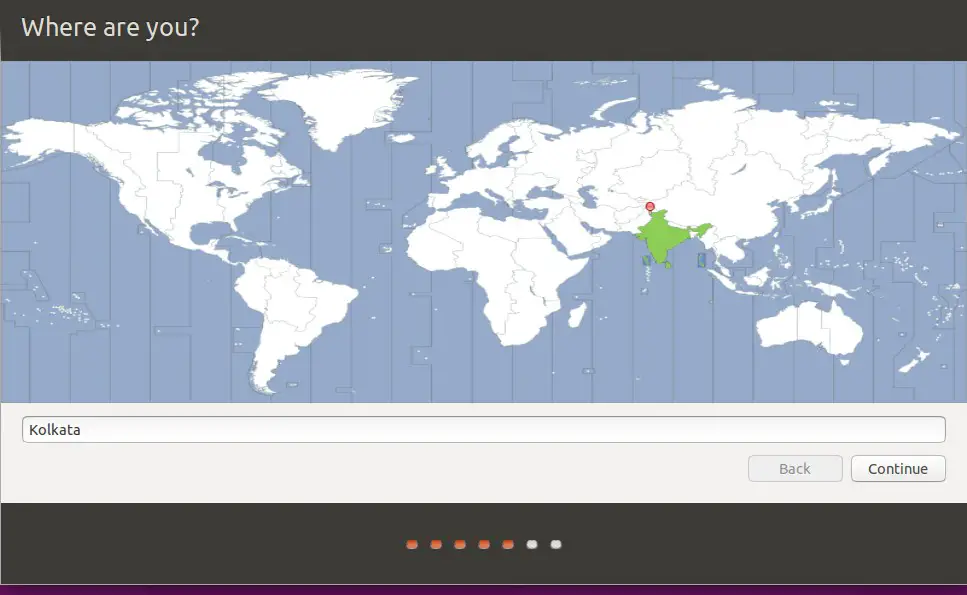
Choose your location that will determine your time zone, and click “Continue.”
Configuring your Keyboard and Language
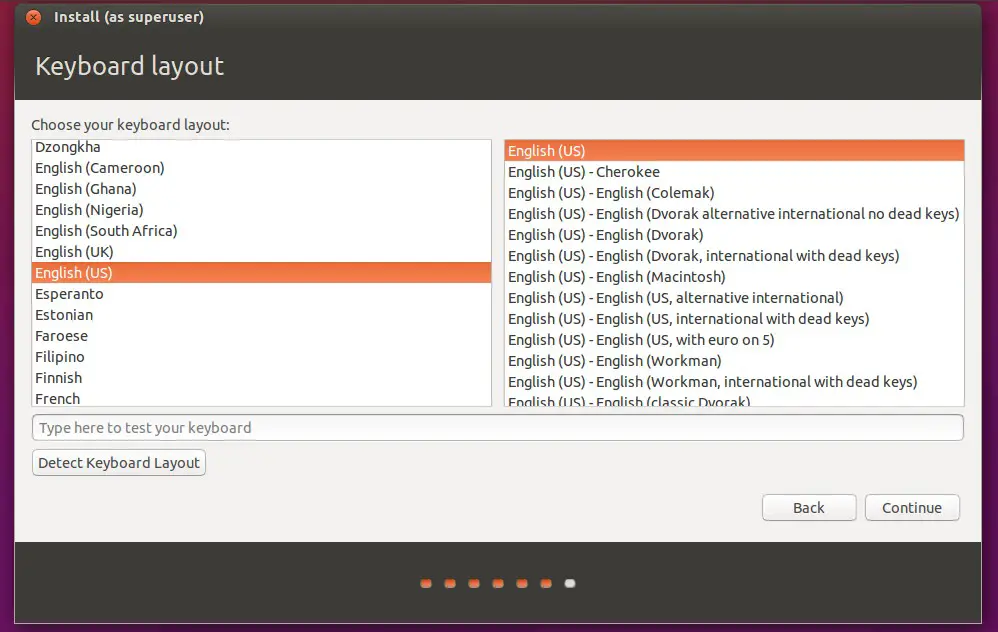
Now choose your keyboard layout. Ubuntu offers you by default of the installation language and time zone previously selected. Thus, in our example above, Ubuntu selected “English (US) by default. You can choose another language of your choice that will serve as the system default language.
Ubuntu offers some countries multiple keyboard layouts. You can generally leave what is selected by default. You are also allowed to test if your PC keyboard is working just fine. Try to see if all your keystrokes are recognized! Then click “Continue“.
User Account and Security
The next stage requires you to create you to create your user account with the following information;
- Your Name
- Your Computer Name (Seen over the network)
- Pick a Username
- Pick a Password
- and Finally setting the option “Require my password on Log in”
- Click Continue
Step 5 (Installation and Reboot)
The final step requires you to just relax and do nothing (a cup of coffee won’t hurt at this stage 🙂 )
After the installation, Reboot the system.
CONGRATULATIONS!! Welcome to Ubuntu 15.10.
Hope you enjoyed our step by step guide to install Ubuntu 15.10 on your PC. The process was smooth and easy if well followed.
Now that you have Installed Ubuntu 15.10, don’t miss our article on the 10 must installed software for Ubuntu 15.10.


Yea… i enjoyed the tutorial…. it was straight to the point and well explained with photos to go by… thanks ytm.
Happy you enjoyed it. I hope you enjoy Ubuntu OS and forget Windows for good. And thanks for dropping comment.
Welcome to the world of #Freedom.
Neumym anglucka