Page Contents
What is Grub Customizer?
Grub Customizer is a simple UI interface application that enable you to tweak your Ubuntu Grub to your taste. Prior to the release of Grub Custmizer, it takes a lot of work, time and energy customizing Grub because it only be done writing codes.
In 2011, Daniel Richter released Grub customizer making it easy for anyone to customize Grub, you can Add/Remove Boot Entries, Change default Operating System, Change boot order, set Grub background and many more.
How to Install Grub Customizer in Ubuntu 14.04 LTS
Grub Customizer can be installed on your Ubuntu 14.04 in two different ways, by using the Ubuntu terminal to fetch its PPA repository and then install or by manually downloading Grub customizer and then install.
Installation Via Terminal (Recommended)
Open your Ubuntu Terminal by opening the dash and type in Terminal or simply press CTRL + ALT + T to open the terminal. Input in the following while pressing enter after each line.
sudo add-apt-repository ppa:danielrichter2007/grub-customizer
sudo apt-get update
sudo apt-get install grub-customizer
After the installation, go to your dash and type Grub Customizer to confirm the installation.
Manual Installation
To install Grub Customizer Manually, simply go to the official Grub Customizer Launchpad Page to download the package. Note it is not recommended to use this method.
Using Grub Customizer
Lauching the Application
Grub Customizer can be launched in two different ways, using the Graphical User Interface (GUI) or launching using the Ubuntu Terminal.
Launching Using GUI: Goto applications > System Tools > Grub Customizer. OR Open Ubuntu Dash and search for Grub Customizer.
Lauching Using Terminal: Open Ubuntu Terminal with CTRL + ALT +T and input;
gksu grub-customizer
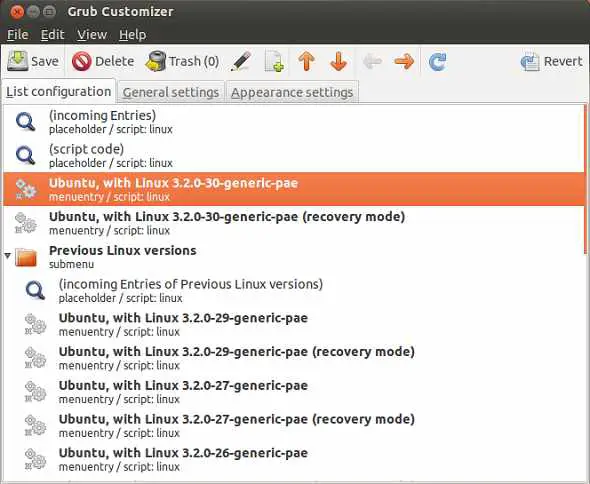
The main Menu Interface
Each Grub 2 script in the /etc/grub.d folder which finds operating systems is depicted in an expanded tree view: linux, memtest86+, os-prober, 40_custom, 41_custom, etc.
- Main:
- Scripts are displayed by their name (in numerical order) in the /etc/grub.d folder.
- Only scripts which deal with operating systems are displayed in the tree. There are no entries for 00_header and 05_header in the tree view.
- Scripts which are active are displayed with a filled orange tick box.
- Scripts which are currently not executable are present but unticked.
- If the main category title is unticked, the subsections are not included in the Grub menu, even if selected.
- Sub Sections:
- linux – The 10_linux script. Listings of your primary Ubuntu OS kernels.
- memtest86+ – The 20_memtest86+ script.
- os-prober – The 30_os-prober script. Finds and displays other operating systems, including Windows and linux systems installed on other partitions.
- custom – In a default installation, the first ‘custom’ refers to 40_custom, and the second ‘custom’ refers to 41_custom.
Customizing Grub
The below options can be found on the main Grub Customizer page.
- Removing / Hiding Entries
- Hide An Entire Section: Untick the main header (linux, os-prober, etc)
- Example: Unticking os-prober will disable the script and remove all entries normally found by it – Windows, other Ubuntu installations, etc. Even if the entries within the subsection are enabled, they will not be displayed.
- Hide Specific Entries: Untick the entry
- Example: Unticking Ubuntu, with 2.6.35-24-generic will remove that specific entry in the Grub 2 menu.
- Hide An Entire Section: Untick the main header (linux, os-prober, etc)
- Freezing Entries (new Entries)
- Unticking “new Entries” prevents the addition of any new Grub 2 menu entries for that section. New options found during updates may be included in the tree view but will not be selected by default.
- If a new item is found by an enabled script, it will not be added to the Grub 2 menu.
- Example: If ‘new Entries’ in ‘linux’ is deselected, when a new kernel is installed on the main system it will not appear in the menu.
- Unticking “new Entries” prevents the addition of any new Grub 2 menu entries for that section. New options found during updates may be included in the tree view but will not be selected by default.
- Adding Entries
- Tick the applicable entry.
- Selecting a main category will enable the script.
- Selecting an item within a main category will add it to the Grub 2 menu if it’s parent is enabled.
- Renaming Entries
- Double-click a menu title to enable the editing mode. Type the new title and click elsewhere on the page to complete the edit.
- Moving Entries
- To move a main section, highlight the entry and use the Up/Dn arrows on the main menu to change the menu order. Moving a main category will move all its submenus.
- Example: If you want Windows to appear before the main Ubuntu entries, move os-prober to the top of the list.
- To move a title up or down within a subsection, highlight the entry and use the Up/Dn arrows on the main menu to change the menu order.
- A titles can only be moved within its own subsection.
- To move a main section, highlight the entry and use the Up/Dn arrows on the main menu to change the menu order. Moving a main category will move all its submenus.
The preferences Menu
This can be found under Edit > Preferences;
- General
Initial display options such as whether the menu is shown, which menu entry is highlighted, and what kernel options to add to the instructions.- Default entry
- How to Specify the Default Entry by Name:
- ‘default entry’ > ‘predefined’: Click on “Entry 1”, on the expanded selection screen choose the exact title from the right column.
- This works for Grub 1.98. Grub 1.99/Natty introduces submenus and using exact titles will change. I don’t know if GC has accounted for this change yet. In the meantime, you can refer to this link on how to manually add a default entry from a submenu: Grub 1.99 Submenus
- How to Specify the Default Entry by Name:
- visibility – Menu display, other OS selections, and timeout.
- kernel parameters – Add options such as nomodeset, noapic, quiet, splash, etc
- Default entry
- Appearance
Menu eye candy – resolutions, colors, background images.- custom resolution
- menu colors
- background image
- Advanced
Selection of options normally found in the /etc/default/grub file. The user can enable/disable individual items and can modify the existing entries by double-clicking the ‘value’ column and entering the desired value.- The only items listed in this section are those which currently exist in /etc/default/grub. The user can enable items displayed here, but cannot add items which do not already exist in the file.
- Ticked items are included in the Grub 2 configuration file.
- Unticked items will not be included in the Grub 2 configuration file. Unticking an entry places a # (comment) symbol at the start of the line in /etc/default/grub
Selecting the Partitions
Accessed via the main menu “File” option, Grub Customizer allows the user to select a partition on which to perform operations. This allows the user to accomplish tasks on another OS’s partition via the chroot process. This is useful when you are running one OS but use another OS’s Grub run the boot process.
For instance, running “update-grub” will update the menu on the current OS. If another partition’s Grub 2 is controlling things, no change in the boot menu will occur unless the change is made within the controlling Grub’s partition. This option allows you to make these changes without booting the controlling OS.
Returning to Grub 2 Default
Daniel Richter describes how to revert to the normal files in his Grub Customizer FAQ.
Note: Original files which Grub Customizer will modify are moved to the /etc/grub.d/proxifiedScripts folder, with the leading numeric designation removed.
The /etc/grub.d/proxifiedScripts and /etc/grub.d/bin folders, and any *_proxy files are only created if a Grub 2 script has to be modified. If only changes normally made to /etc/default/grub are invoked by Grub Customizer, the following won’t be necessary.
To restore the normal Grub 2 control of the boot menu:
- Remove the /etc/grub.d/bin folder
- Move the contents of /etc/grub.d/proxifiedScritps back to the /etc/grub.d folder.
- Any files moved back need to be renamed to the original name.
- linux back to 10_linux, os-prober back to 30_os-prober, etc.
- Remove the /etc/grub.d/proxifiedScipts folder once it is empty.
- Check the settings in /etc/default/grub and make any desired changes (default kernel, timeout, etc).
- Run “sudo update-grub”.


