Introduction
Docker containers are devised to supply a self-sufficient domain with all the software’s libraries and structures. They can extend unorganized with old, outdated, and unused components during evolution.
Docker makes it effortless to encase your applications and services in containers so you can run them everywhere. Nevertheless, as you operate with Docker, it’s also comfortable to accumulate an absurd number of new images, data volumes, and containers that clutter the outcome and deplete disk space.
Docker offers you all the tools you require to cleanse up your system from the command line. This cheat sheet-style article delivers a brief reference to commands useful in releasing disk space and maintaining your device systematized by terminating new Docker images, volumes, and containers.
This article will instruct you in building and removing the docker containers and images in Linux. This will assist you in organizing a Docker environment by removing Docker images.
Creating and removing Docker Containers and Images in Linux
A Dockerfile is a script/textbook file comprised of different commands and statements listed sequentially to automatically execute actions on a ground image to make a new one. It allows us to avoid administering the command while running the container. They are operated for systematizing things and significantly help deployments by facilitating the strategy from start to end. It begins with specifying an image from the build procedure and provides a new image with essential commands and arguments for creating docker containers.
So, here are short and manageable steps to operate a Dockerfile to Create a Docker Container.
- Docker Commands
Before creating our Dockerfile, we must learn the essential commands to create a functional Dockerfile. There are hundreds of directive that can be operated to make it, but we’ll quickly learn regarding those commands.
ADD
Add command is operated to copy the files from a source directory to a goal. The origin can even be an URL. The command will download the target to the terminus directory if it’s an URL.
CMD
The CMD command is operated to perpetuate specific commands by creating containers established on the image. It is equivalent to the RUN command, whereas CMD is not accomplished during the build.
ENTRYPOINT
ENTRYPOINT command sets the actual default application operated every time a container is created manipulating the image.
ENV
ENV is utilized to arrange the environment variables. The docker container can approach these variables, delivering enormous flexibility for running programs.
FROM
FROM command defines the base image to begin the build process, which can be any docker image, whether it’s on the host or in the depository.
WORKER
The WORKDIR command is operated to set where the command defined with CMD will be performed.
RUN
RUN is the command operated to create the docker images, a centrally implementing directive for the Dockerfiles.
MAINTAINER
MAINTAINER is the command which doesn’t get accomplished but displays the author, hence placing the author field of the images.
USER
The USER command sets the UID (or username) to run the container established on the image being built.
VOLUME
The VOLUME directive is operated to enable access from your container to a directory on the host device.
EXPOSE
The EXPOSE directory associates a specified pier to facilitate networking between the running operation inside the container and the host.
- Creating a Dockerfile
After we understand the essential commands to create our directed container, we’ll ultimately get our hands dirty with building a Dockerfile to do our assignment done. We’ll build a Dockerfile to create an image to install the Nginx Net Server container. For that, we’ll require to create a file named Dockerfile with our famous text editor.
$ Sudo Nano Dockerfile
Then, we’d like to add our Docker configuration, which contains the commands and statements for the Nginx Web Server Container.
# Pull Base Image.FROM Dockerfile/Ubuntu# Install Nginx.RUN \Add-apt-Repository -y ppa:NGINX/stable && \Apt-get Update && \Apt-get Install -y NGINX&& \rm -rf /var/lib/Apt/LISTS/* && \Echo “\ndaemon off;” >> /etc/NGINX/nginx.conf && \Chown -R www-data:www-data /VAR/lib/nginx# Define fixable directories.VOLUME [“/etc/NGINX/sites-enabled”, “/etc/NGINX/certs”, “/etc/NGINX/conf.d”, “/var/log/NGINX”, “/var/www/html”]# Define functioning directory.WORKDIR /etc/NGINX# Define default command.CMD [“NGINX”]# Expose ports.EXPOSE 80EXPOSE 443
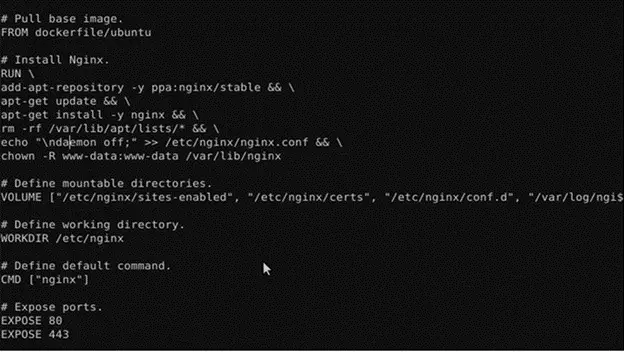
After obtaining the files with the overhead commands, we’ll like to hold the file and exit towards running that Dockerfile.
- Creating an Image using Dockerfile
Docker images are nothing but a collection of read-only files, which suggests once the docker image is created, it can not be changed. Regardless, you can construct a new docker image using the existing docker image. Docker images are used to build a docker container. Docker images arrive with multiple layers utilized to run code within a container. Many new and obsolete docker images are held on the server during the evolution process until you manually terminate them.
So it is needed to remove the new docker image from your system to liberate the disk space.
After we deplete creating our Dockerfile for the Nginx Web Server Container, we’ll ultimately create an image operating that Dockerfile. We’ll require to run the following command in our working base directory to create an image.
# Sudo Docker build -t my_

NGINX.
The overhead command will create an image titled my_NGINX using the Dockerfile created.
- Creating a Docker Container
Operating the image we built, we’ll proceed directly to create a container running an Nginx Web Server model inside, using a name of our preference. Here its my_NGINX_instance.
# docker run –name my_NGINX_instance -p 80:80 -d my_NGINX

Finally, we have built our Nginx Container and is delivered it to port 80. Now to review if it’s running accurately or not, we can run docker ps.
# docker ps

How to Remove Docker Containers
A container creates a unique environment in which a function can be executed. Many containers are created and tested abandoned during the development lifecycle.
Thus, it’s crucial to understand how to find extreme containers and terminate them.
Stop Containers
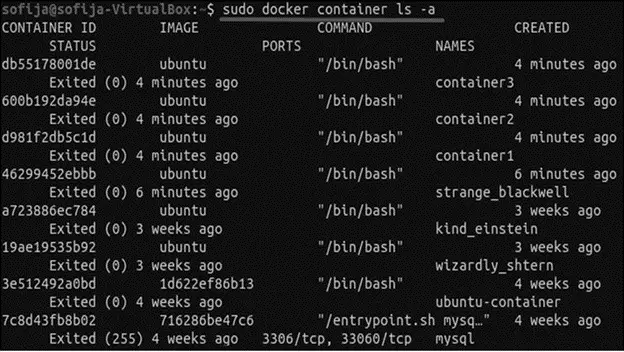
- First, document all Docker containers operating the command:
docker container ls -a
The outcome shows a list of all running containers, their IDs, images, names, status, and other parameters.
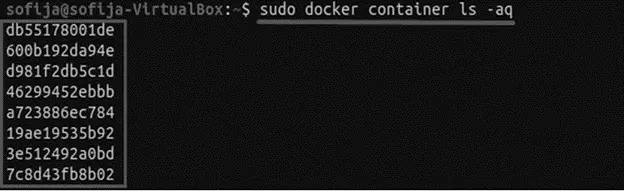
You can also develop an inventory of all the containers only by their numeric ID’s, run the command:
docker container ls -aq
- To control a specific container, enter the following:
docker container ending [container_id]
Substitute [container_id] with the numeric ID of the container from your list. You can document multiple container IDs into the same command.
To intercept all containers, enter:
Docker container stop $(docker container ls -aq)
This leverages Docker to operate the list of all container IDs as the mark of the stop command.
Remove a Stopped Container
To remove a stopped container, operate the command:
docker container rm [container_id]
Like earlier, this terminates a container with the ID you establish.
Remove All Stopped Containers
To terminate all stopped containers:
docker container rm $(docker container ls -aq)
Remove All Docker Containers
To swab Docker immaculate and start from scrape, enter the command:
docker container STOP$(docker container ls -aq) && docker system prune -of –volumes
This requires Docker to stop the containers recorded in the parentheses.
Inside the parentheses, you require Docker to develop a checklist of all the containers with their numeric ID. Then, the report is passed back to the container stop command and controls all the containers. The && command mandates Docker to terminate all stopped containers and volumes. -af shows this should involve all containers (a) without a necessary confirmation (f).
Drawing Container With Filters
You can also select to delete all objects that do not approximate a specified slip. To do so, use the command:
docker container prune –filter=”LABEL!=maintainer=Jeremy”
This command tells Docker to terminate all not marked containers with an upholder sustainer of “Jeremy.” The != command is a logical inscription that means “not equal to.”
The disintegration of the label commands:
1. label=<KEY>2. label=<KEY>=<VALUE>3. label!=<KEY>4. label!=<KEY>=<VALUE>
Operating these terms in confluence with labels gives you in-depth command over releasing support in Docker.
How to Remove Docker Images
Docker images are files that possess multiple layers operated to run code within a container. Images may go via many iterations during a consequence. Outdated and old images can clutter your device, bringing up storage space and creating searches that are more unmanageable.
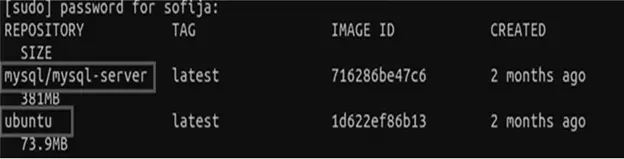
- To remove a Docker image, begin by documenting all the images on your system:
docker image ls
The output shows the locally known Docker images, as given below.
- Note the IMAGE ID – the identifier employed to withdraw the image.
- Then, extract the unwanted image(s):
docker image rm [IMAGE_id1]
Replace [IMAGE_id2] and [IMAGE_id1] with the image ID you pulled from the first command. You can document an individual Image ID or multiple IDs for removal. The system may answer your recommendation with an error notification that there is a conflict and it cannot remove the storage reference. This suggests that a container is manipulating the image. You require to remove the container first before you can clear the image.
Removing Docker Images With Filters
The only subsidized filters are until and labeled at the time of periodical. Still, these are practical tools for operating Docker resources. Use the until filter to extract all resources up to a disseminated time.
Enter the following:
docker image prune -a –FILTER”until=24h”
This terminates all (-a) images created over the last 24 hours. The command can be utilized for containers, filters, and images. Make certain to specify the asset you want to remove.
This terminates all docker images that have been labeled “old.” Filtering can also be utilized to define a precise value of a label.
For example, if a container is marked with a “maintainer” key, and the importance of “maintainer” is either “bill” or “Jeremy,” you can type:
docker container prune –filter=”label=maintainer”
Docker then terminates all containers with the tag “maintainer” with a value of “bill.”
Verdict
This tutorial introduced us to creating and using a Dockerfile to create a Docker Container. Docker Container is manageable to create after calculating what should go inside the Dockerfile. Dockerfile is critical for making the container because it is accountable for its configuration. During the evolution cycle of an application in Docker receptacles, it’s effortless to use a lot of hold with old interpretations of images and containers.